
Here's a scenario I ran into just last week. I was working on some code to edit PowerPoint PPTX files using C# and the OpenXML libraries. If you've ever tried using them before, you know that the OpenXML libraries are impossibly complex and nearly impossible to understand. And as much as I might have wanted to keep my code simple, I was losing and the complexity was growing.
The bugs I was getting were pretty complex, too. I'd put a bunch breakpoints in my code and then I'd be using the debug visualization tools in Visual Studio to try to figure out what was going wrong. But the problem was the my bugs could be just about anywhere in a giant tree of objects. It was really hard to figure out what was going on just by looking at the debug windows. For example, just check out that Locals debugging window in the screenshot below. It's nested object after nested object after nested object.
 [Click on image for larger view.]
I needed to tame that debugging sprawl.
The [DebuggerDisplay] Attribute
I'm not sure how I found out about this, but there's this cool feature in Visual Studio and .NET that lets you customize how your objects appear in the debugger. It's the DebuggerDisplay attribute in System.Diagnostics. I'd never used it before because -- well -- I just assumed that it must be difficult to use.
But it turns out that it's super easy to implement. If you know how to use interpolated strings, you pretty much know how to implement the debugger display attribute.
Here's a quick review of interpolated strings. Let's say that you have three values that you want to combine into a single string: current date, a random number, and the OS version string. You could combine them using the "+" operator -- that's the old-school, original way.
Or you could combine them using string interpolation. Just put a "$" in front of the string and then wrap the variable names you want to use inside of curly braces. Done.
 [Click on image for larger view.]
Tame the Debugging Mess
Rather than try to demo this with OpenXml APIs, I'm going to introduce a more understandable example. Let's say that I have a Person class that has a property for Name and a property for PhoneNumber. Most of the time you'd probably just have a Person class with a string property for FirstName, a string property for LastName, and a string property for PhoneNumber. But since I need some complexity, I'm splitting these into separate classes so that I get an object model:
 [Click on image for larger view.]
To keep adding complexity, let's say that I'm writing my own PersonCollection class and I'm trying to write a unit test to make sure that when I "foreach" over the PersonCollection, that the objects are always returned in alphabetical order by name.
The test is failing and I'm not sure why, so I put a breakpoint on the code and go to take a look in the debugger:
 [Click on image for larger view.]
When I look at the "actual" collection variable in the debugger, I see a list of 5 objects but I can't see the values:
 [Click on image for larger view.]
In order to figure out what the values are, I need to start expanding properties in the watch window. That gives me something that looks like this:
 [Click on image for larger view.]
So, I can see that the values are clearly not sorted by last name but the next time that I run this code, it's going to show me the original view and I'm going to have to click a bunch of times to get to the data.
Add the DebuggerDisplay Attribute
What would be a lot nicer would be a simple view of my Person properties right in the debugger when I'm looking at that collection. This is exactly what the DebuggerDisplay attribute does.
At the top of the Person class, I'll just add the DebuggerDisplay attribute and then provide it with an interpolated string describing how I'd like to visualize the data in the debugger. In this case, I want to see the LastName value, a comma, FirstName, and then the phone number.
 [Click on image for larger view.]
The next time that I run this code and hit that breakpoint, I see much more descriptive data in the Values column:
 [Click on image for larger view.]
And now I can focus on fixing my bug rather than crawling through a tree of values in the watch windows.
Conclusion
Debugging complex trees of objects can be difficult even with great debugging tools. In order to make it easier on yourself, consider adding the DebuggerDisplay attribute to those difficult-to-debug classes. DebuggerDisplay allows you to provide a view of your object in the Visual Studio debugger windows that have exactly the data you need to see in order to fix your problems.
If you'd like the source code for this demo, you can get it on GitHub.
About the Author
Benjamin Day is a consultant, trainer and author specializing in software development, project management and leadership.
Posted by Benjamin Day on 10/17/20240 comments

Integration testing is a crucial step in ensuring that your application behaves correctly when different components interact with one another. In ASP.NET Core, the WebApplicationFactory<TEntryPoint> class makes it easier to test your web applications by allowing you to spin up an instance of your app in-memory and run integration tests against it.
As a new author contributing to the VSLive! Blog, in my inaugural post I'll walk you through how to use WebApplicationFactory for integration testing, using a simple ASP.NET Core web application. We'll write tests to ensure that the Home page is functioning as expected. Let's dive in!
Structure of the Sample Project
This post includes a code sample with "before" and "after" versions of the code.
 [Click on image for larger view.]
In the solution shown above we have a total of four projects. We have two main projects:
- API Project: A .NET Core class library containing business logic.
- Web Project: An ASP.NET MVC application with the front-end logic.
Additionally, we have two test projects:
- Unit Tests: For testing the API logic in isolation.
- Integration Tests: For testing interactions between components, such as controllers and views, within the actual application.
We'll focus on the Integration Tests project, using WebApplicationFactory to create tests that check if the web application behaves correctly in real-world scenarios.
What Is WebApplicationFactory?
WebApplicationFactory<TEntryPoint> is a handy class in ASP.NET Core that allows us to spin up our application in-memory for testing purposes. This eliminates the need for dealing with network ports or external dependencies during testing. By creating an in-memory version of the application, we can run HTTP requests against it, similar to how we would interact with the deployed app.
Creating an Integration Test
Let's create a test to verify that the Home page of our web application displays the text "Hello World." To get started, open your Integration Test project, right-click, and add a new class. We'll name it HomeControllerFixture.
Writing the Test -- Here's the basic structure of our test:
public async void IndexContainsHelloWorld()
{
    // arrange
    var factory = new WebApplicationFactory<JustAnEmptyClass>();
    var client = factory.CreateClient();

    // act
    var response = await client.GetAsync("/");

    // assert
    Assert.NotNull(response);

    var content = await response.Content.ReadAsStringAsync();
    Assert.Contains("Hello, world!", content);

    Assert.True(response.IsSuccessStatusCode);
}
Breakdown of the Test:
-
Arrange:
- We create an instance of
WebApplicationFactory<JustAnEmptyClass> and use it to spin up an in-memory version of our app.
- Using
CreateClient(), we get an instance of HttpClient that knows how to communicate with the in-memory application.
-
Act:
- The
client.GetAsync("/") method makes an HTTP GET request to the root of the application, similar to navigating to the home page in a browser.
-
Assert:
- We use
EnsureSuccessStatusCode() to check if the request was successful (i.e., it returned a 200 status code).
- We then read the response content and check that it contains the string "Hello World" using
Assert.Contains().
Handling the Missing Startup Class
You might notice that we reference a class called JustAnEmptyClass instead of the Startup class. Here's why: In older ASP.NET Core projects, the Startup.cs file was used to configure the application. However, in newer project templates, the Program.cs file has taken over this role, combining the functionality of both Program and Startup. This is all part of the change to add "top-level statements" to C#. On the one hand, it simplifies the code. On the other hand, it sometimes gets in the way, and this is one of those cases where it gets in the way.
If your project actually has a Startup.cs class, then you can use that (WebApplicationFactory) instead of creating this empty, marker class. Or if you'd like to have your project actually use that style of project you can easily do that by adding the --use-program-main option to your dotnet new command when you create your project.
Unfortunately, WebApplicationFactory doesn't work directly with the Program class. The workaround is simple: create an empty class and use it as a placeholder for WebApplicationFactory. This doesn't interfere with the functionality of your application but allows you to run your tests.
// JustAnEmptyClass.cs
public class JustAnEmptyClass
{
    // This class is intentionally left empty.

}
Now, when creating the factory, we reference JustAnEmptyClass instead of Startup or Program.
Running the Tests: It Fails
After writing the test, run it from your Test Explorer window. If you encounter an error that the test is missing, check that you've added the [Fact] attribute to the test method -- this tells the test framework that it's a test that should be run.
Upon running the test, it should fail initially because the home page doesn't yet contain the string "Hello World."
 [Click on image for larger view.]
Fixing the Failure
In our sample application, fixing this problem is easy enough. There's nothing on the home page that says "hello world" and therefore we just need to add that. In real-life development situations, you'll probably be testing for more complex things and you might need to write some real code.
To fix this, let's add "Hello World" to our Home page.
 [Click on image for larger view.]
- In Solution Explorer, open up the web application and go to the Views folder and then the Home folder.
- Open Index.cshtml.
- Add a paragraph containing "Hello World."
- Save the file and rerun the test.
When you've made the changes to Index.cshtml, it should look something like this:
 [Click on image for larger view.]
This time, when you run the tests, the test should pass, confirming that our integration test successfully verifies the content of the home page.
 [Click on image for larger view.]
Conclusion
Using WebApplicationFactory, we can easily write integration tests that spin up an in-memory version of our ASP.NET Core application. This allows us to test the interaction between controllers, views, and other components without needing to deploy the app to a server.
In this demo, we wrote a test to check that the Home page contains "Hello World," but you can extend this approach to test more complex scenarios like API endpoints, form submissions and more.
Posted by Benjamin Day on 09/23/20240 comments

In today's diverse development landscape, cross-platform readiness isn't just a nice-to-have -- it's a necessity. Developers are increasingly tasked with ensuring their applications run smoothly across multiple operating systems and environments. Python and Blazor, both designed with cross-platform capabilities in mind, are indispensable tools in a modern developer's toolkit.
To help developers sharpen these critical skills, Microsoft MVPs Rockford Lhotka and Eric D. Boyd are each presenting at the upcoming Live! 360 conference in Orlando, Fla. Make sure to register and catch Lhotka's three Blazor sessions and Boyd's two-day Python lab.
In the meantime, read their in-depth Microsoft Q&A where they share key takeaways from their recent presentations at the VSLive! event at Microsoft's Redmond headquarters.
Posted on 09/12/20240 comments

Devs surely do still love their SQL, but Microsoft executives are touting what they call "modern SQL" for building applications using the latest and greatest data technologies.
So what are those technologies that provide a new take on your beloved and familiar SQL? You start off with, of course, AI, specifically generative AI -- Copilots at Microsoft -- that has transformed software development along with the rest of IT. Then, being firmly in the Microsoft development camp, you add Microsoft Fabric, which is an end-to-end analytics/data platform that encompasses data movement, processing, ingestion, transformation, real-time event routing and report building.
 [Click on image for larger view.] Microsoft Fabric Architecture (source: Microsoft).
To learn what else you need to do, those same Microsoft executives will explain everything in a keynote session at the upcoming Visual Studio Live! developer conference being held at Microsoft HQ in Redmond, Wash., from Aug. 5-9. Specifically on hand for a keynote titled "Building Applications with the Modern SQL Using AI and Microsoft Fabric" are Asad Khan, Vice President of SQL Products and Services, Microsoft, and Bob Ward, Principal Architect, Microsoft Azure Data, Microsoft.
"We will show practical examples of how to build Generative AI applications with your data securely and at scale," they said of their keynote. "You will also learn how to use Microsoft Copilot experiences to help you build your application, manage your database, and develop SQL queries. You will also learn how to take advantage of the integration of SQL with Microsoft Fabric opening new possibilities for your data in a unified platform for analytics and AI."
We caught up with Asad and Bob to learn more about their keynote, which is scheduled for Aug. 7, 2024, from 1:30 p.m. to 2:30 p.m.
VSLive! What makes SQL still a beloved tool among developers, even with the advent of more modern data solutions?
Bob: I think first and foremost is that SQL is a platform and a brand you can rely on. SQL Server has been a leading industry database platform for decades including security, performance, and availability for all applications.
 "Whether you are a startup or a large enterprise you know you can host your data with SQL and then build any application you need using skills and tools that you know and love."
Bob Ward, Principal Architect, Microsoft Azure Data, Microsoft
Whether you are a startup or a large enterprise you know you can host your data with SQL and then build any application you need using skills and tools that you know and love.
Can you summarize how Microsoft's strategy leverages SQL from ground to cloud to build robust applications?
Asad: Microsoft is a leader in the database industry to allow developers to "build once, deploy anywhere." SQL provides a unique compatible database experience for developers whether it be with Windows, Linux, Containers, Kubernetes, private, or public clouds. Since all of SQL, ground to cloud, is built on the same code base it has a common query processor, a common set of providers, tools like SSMS, and the popular T-SQL language to allow developers to have a robust and consistent experience.
How does the integration of SQL with Microsoft Fabric transform the landscape for analytics and AI projects?
Asad: Microsoft Fabric is becoming the standard for a unified data platform. It brings in so many different services including AI, analytics, data engineering, and data warehousing all under a unified user experience and storage platform called OneLake. Mirroring is a capability that allows you to bring your data from various sources in a seamless manner, including automatic change detection, into OneLake. We are excited SQL is already one of the most popular data sources for mirroring. We are just getting started with the integration between SQL and Microsoft Fabric so stay tuned.
In what ways does Microsoft Copilot streamline the process of building applications, managing databases, and developing SQL queries?
Bob: We are in the "age of Copilots" across many Microsoft products and services. I see people just using Copilots "where they live" and interact with them every day. We have a unique set of Copilot experiences for SQL including contextual aware self-help for time consuming tasks like troubleshooting and the ability to generate complex T-SQL queries using natural language. We are providing industry differentiating experiences that I believe developers and IT Pros will see how much faster they can build applications and manage databases with our Copilot skills. This is just the beginning. You will see us continue to innovate our Copilot experiences for SQL ground to cloud.
What is one practical example you will use to show how devs can build Generative AI applications with data securely and at scale?
Bob: For me it is hybrid search. You have a new "smarter and intelligent" search inside the SQL engine by combing vector data (embeddings), vector search, and the power of the SQL query processor. SQL provides methods inside the database to interact with language models in a new way for better searching using natural language. If you combine this with our new JSON data type and Regular Expression (RegEx) capabilities using T-SQL, developers can now "get smarter with their data" using the familiar skills of SQL they have known for years.
What do you hope people will take away from your keynote?
Asad: One of the big takeaways is that along with SQL's traditional strength, we believe SQL is a modern data solution for developers. Consider that SQL allows you to build any application you need with capabilities all built into the database with features like JSON, Graph, Spatial, Columnstore, and Ledger that normally require you to purchase multiple products that don't integrate with each other. Combine this now with GenAI, Microsoft Fabric, and developer interfaces like GraphQL, all within the security boundary of the engine, SQL is poised to be your modern database for the future.
Note: Those wishing to attend the conference can save hundreds of dollars by registering early, according to the event's pricing page. "Register for VSLive! at Microsoft HQ by the Early Bird deadline of July 12 to save up to $300 and secure your seat for intensive developer training at Microsoft HQ in Redmond!" said the organizer of the developer conference.
Posted by David Ramel on 07/08/20240 comments

Hey Y'all! VSLive @ Microsoft HQ is happening the first week of August. While I won't be there, my good friend Brian Randell will, and he has a couple of Copilot sessions you won't want to miss. One of the things I'm betting will come up in those sessions is GitHub Copilot Chat.
Now back in February, I wrote a post about "Getting Started with GitHub Copilot" where I introduced you to the completion feature of GitHub Copilot when you add comments to your code. I thought this would be a good time to now introduce you to GitHub Copilot Chat.
Why AI in Coding Is Important
In the rapidly evolving landscape of software development, AI has emerged as a transformative force. AI in coding is revolutionizing how developers approach problem-solving, significantly enhancing productivity and enabling the creation of more robust and efficient code. By automating repetitive tasks and providing intelligent code suggestions, AI reduces the cognitive load on developers, allowing them to focus on more complex and creative aspects of their projects. This integration of AI tools not only accelerates the development process but also fosters innovation, making it easier to experiment and iterate rapidly.
What Is GitHub Copilot Chat
GitHub Copilot Chat is a chat interface that lets you interact with GitHub Copilot, to ask and receive answers to coding-related questions within GitHub.com and supported IDEs (such as Visual Studio Code and Visual Studio 2022). While previously with GitHub Copilot, we were adding comments to our code and GitHub Copilot was then making code suggestions, GitHub Copilot Chat gives us a chat interface for working with GitHub Copilot.
This tool goes beyond simple autocomplete functionalities. GitHub Copilot Chat can generate entire code snippets, provide explanations for specific pieces of code, and even help debug errors. It acts as a conversational partner, making the coding process more interactive and intuitive. Whether you're trying to implement a new feature, understand an unfamiliar codebase, or fix a bug, Copilot Chat is designed to assist you at every step. Its ability to interpret natural language queries means you can ask for help in plain English, making it accessible to developers of all skill levels.
GitHub Copilot Chat takes the information you enter in the chat window, along with contextual information from the environment, such as the code selected or the tabs that are open in your IDE, and uses this information to help provide answers to your questions.
Getting Started with GitHub Copilot Chat
To allow you to compare and contrast using GitHub Copilot code completion vs. GitHub Copilot Chat, I thought we would take the same example from the February article, but use GitHub Copilot Chat to build it. So we are going to create a simple Python project, in VS Code, to create a function to calculate the factorial of a number.
You will need the following if you want to try this yourself:
- VS Code installed
- GitHub Copilot extension installed in VS Code
- GitHub Copilot Chat extension installed in VS Code
- An active GitHub Copilot subscription
Let's run through the following steps:
-
Open VS Code and select the GitHub Copilot Chat extension. This will open a pane in VS Code with a text box for you to start chatting with GitHub Copilot. GitHub Copilot Chat has a variety of slash commands you can use, as shown in Figure 1.
 [Click on image for larger view.] Figure 1: Slash Commands
With these commands you can ask GitHub Copilot to explain code to you, fix errors in your code, or even start a new project for you.
-
We are going to use the /new command to create a new workspace for our python application. Figure 2 shows you the information I typed into the chat window, and the GitHub Copilot response.
 [Click on image for larger view.] Figure 2: Create a Python Application
You can see the workspace it is proposing to create for me. This looks good, so I click Create Workspace. It prompts me on where to create it, and then it creates the factorial.py and README.md files.
-
Now here is where things get cool. First off, it creates the factorial.py file, shown in Figure 3.
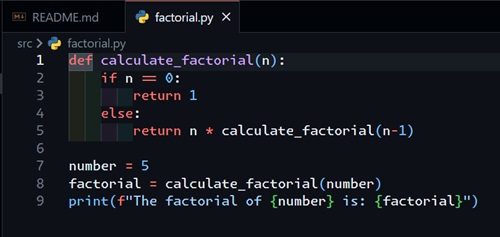 [Click on image for larger view.] Figure 3: Creating the Factorial.py File
This looks very similar to what GitHub Copilot code completion did for us in February.
But what is also cool is that it creates a README.md file, explaining what this project and code do, partially shown in Figure 4.
 [Click on image for larger view.] Figure 4: Creating README.md File
-
Now, maybe I don't quite understand the code in Figure 3. I can highlight the code, then back over in GitHub Copilot Chat, I can ask it to explain the selected code (Figure 5).
 [Click on image for larger view.] Figure 5: Explain the Selected Code
And check it out, it not only explained the code to me, it also suggested I add input validation to handle invalid inputs, like negative numbers, and even provided me the updated code for that scenario.
This is just a simple introduction to GitHub Copilot Chat, using only a couple of basic commands. I've used this to create entire applications in programming languages that I have no experience with. And just wait until you start running into error messages that you don't understand. I've been able to feed the error message to GitHub Copilot Chat, and it has quickly come back with suggestions to resolve the error messages.
The more context you can provide GitHub Copilot Chat, the better it will do in answering your questions. For example, it will use all the information you have previously entered in the current chat, as well as the tabs you have open in VS Code.
Conclusion
GitHub Copilot Chat represents a significant leap forward in the realm of AI-assisted coding. By providing real-time, context-aware assistance directly within VS Code, it transforms the development experience, making it more efficient and enjoyable. This tool not only enhances productivity but also fosters a deeper understanding of coding practices, thereby improving the quality of the code produced.
As AI continues to evolve, tools like GitHub Copilot Chat will become increasingly integral to the software development process. They empower developers to tackle more complex problems with confidence, streamline the coding workflow, and ensure adherence to best practices. Embracing these advancements will undoubtedly pave the way for more innovative and effective software solutions in the future. Whether you're a seasoned developer or just starting, integrating GitHub Copilot Chat into your workflow can significantly enhance your coding capabilities and efficiency.
Happy Coding!
Posted by Mickey Gousset on 06/24/20240 comments

In the world of software development, managing source code effectively is crucial for the success of projects, especially as they scale. One of the most important decisions teams must make is how to structure their codebase: using a monolithic repository (monorepo) or multiple repositories (multirepo).
This article explores the advantages and disadvantages of adopting a monorepo, with a focus on how platforms like GitHub and Azure DevOps support this model.
What is a Monorepo?
A monorepo is a version control strategy that involves storing all the code for multiple projects within a single repository. This approach is contrasted with a multirepo strategy, where each project or service has its own repository. Large tech companies such as Google and Facebook have popularized the use of monorepos, but its adoption varies based on organizational needs and preferences.
Let's start with a look at some reasons why you might want to use a monorepo strategy.
Pros of Using a Monorepo
1. Simplified Dependency Management
One of the most significant advantages of a monorepo is the simplification of dependency management. In a monorepo, shared libraries and services are kept within the same repository, making it easier to manage dependencies across multiple projects.
For instance, when a shared library is updated, all dependent projects within the monorepo can be immediately tested with the new version, ensuring compatibility and reducing the risk of integration issues. Platforms like GitHub support monorepos through robust branching and tagging features that help manage different versions of dependencies in a single repository.
2. Unified Versioning and Coordination
Monorepos allow teams to implement unified versioning for all projects within the repository. This ensures that every component of the system is compatible and up-to-date with the others, facilitating easier tracking of changes and regressions. With tools such as Azure DevOps, teams can leverage build and release pipelines that apply across all projects in the monorepo, enabling consistent deployment processes and reducing overhead in managing separate pipelines for each repository.
3. Streamlined Workflow and Tooling Consolidation
Adopting a monorepo can significantly streamline the development workflow and consolidate tooling across multiple projects. By having a single repository, teams can standardize on a single set of tools for version control, continuous integration (CI) and continuous deployment (CD). This uniformity eliminates the need for developers to switch contexts between different projects and tools, which can enhance productivity and reduce the learning curve for new team members.
For example, platforms like GitHub and Azure DevOps support comprehensive CI/CD pipelines that can be configured once and utilized across all projects within the monorepo. This not only simplifies the development process but also ensures consistency in build and release practices across the entire organization.
Of course, there are also reasons why a monorepo may not be right for you.
Cons of Using a Monorepo
1. Scalability Challenges
As the number of projects in a monorepo grows, so does the complexity and size of the repository. This can lead to scalability issues such as slower build times and more cumbersome repository management. Tools like GitHub and Azure DevOps offer features like sparse checkouts and selective builds to mitigate these issues, but they require additional configuration and maintenance, which can be a burden for large teams or projects.
2. Increased Complexity in Access Control
Managing access rights in a monorepo can be more challenging than in multirepos. Since all projects are contained within a single repository, ensuring that only authorized personnel have access to specific parts of the codebase can be complex. Although platforms like Azure DevOps provide granular access control mechanisms, setting up and maintaining these permissions can be intricate and error-prone.
3. Risk of Coupling and Tight Integration
The convenience of having all projects in one repository can inadvertently lead to tight coupling of unrelated projects. This coupling can make it difficult to isolate projects from one another, leading to potential issues when changes in one project adversely affect others. Such integration risks can complicate refactoring and scaling efforts, making it harder to manage the codebase as the number of projects increases.
Conclusion
Choosing between a monorepo and multirepo setup depends on the specific needs and context of the development team. While monorepos offer significant advantages in terms of simplified dependency management, unified versioning and ease of code reuse, they also come with challenges related to scalability, complexity in access control and risk of tight integration.
Tools like GitHub and Azure DevOps provide features that can help mitigate some of these challenges, but they also require careful configuration and management. Ultimately, the decision should be guided by the specific operational and strategic goals of the organization.
Posted by Mickey Gousset on 05/23/20240 comments

.NET supports the Dependency Injection (DI) software design pattern, which Microsoft describes as a technique for achieving Inversion of Control (IoC) between classes and their dependencies, such that components receive their dependencies from an external source (usually a framework or container), allowing the caller to provide necessary dependencies rather than the component creating them internally.
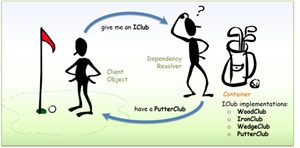 [Click on image for larger view.] The DI Design Pattern in a Golf Analogy (source: Microsoft).
For those new to DI and IoC, the concepts can be challenging to grasp. To help developers understand the "what" and "why" of the technique, Jeremy Clark, a developer, consultant and educator who provides "byte-sized chunks of .NET" on his Jeremy Bytes site, will present a session titled "DI Why? Getting a Grip on Dependency Injection" at the upcoming Visual Studio Live! developer conference taking place August 5-9 at Microsoft Headquarters in Redmond, Wash.
"We'll look at the problems caused by tight coupling," said the Microsoft MVP for .NET. "Then we'll use some DI patterns such as constructor injection and property injection to break that tight coupling. We'll see how loosely coupled applications are easier to extend and test. With a better understanding of the basic patterns, we'll remove the magic behind DI containers so that we can use the tools appropriately in our code."
Attendees of the 75-minute introductory/intermediate-level session are promised to learn to:
- See the problems that DI can solve
- Understand DI by using it without a container
- See how a DI container can add some magic and reduce some code
We caught up with Clark to get a preview of his session and to learn more about the benefits of DI in modern software development in a Q&A.
VisualStudioLive! What inspired you to present a session on this topic?
Clark: When I was first introduced to DI, I was given an existing application that used a DI container and basically told, "Good luck." I had to do quite a bit of reading and exploration to understand why the application needed DI and also exactly what the DI container did.
 "This session is the resource I wish I had when I was learning: the 'what' and 'why' of Dependency Injection."
Jeremy Clark, Developer Educator
This session is the resource I wish I had when I was learning: the "what" and "why" of Dependency Injection.
DI has been around for a long time. Is it still relevant?
DI is even more important today than when I started using it. ASP.NET Core has a built-in DI container (whether you explicitly use it or not). And when we use the new project templates to create an application with controllers (either MVC or API controllers), an "ILogger" is injected as part of the controller constructor.
public class HomeController : Controller
{
    private readonly ILogger<HomeController> _logger;

    public HomeController(ILogger<HomeController> logger)
    {
        _logger = logger;
    }

    // additional code omitted.
}
If you are not familiar with DI, your reaction might be, "What is this ILogger, and where does it come from?" But with a good handle on DI, the code is much more approachable: "This is an injected logger dependency, and the DI container makes sure that we have a valid logger available to us here."
And if you use ASP.NET Core Minimal APIs, the DI container is just as useful to make sure you have everything you need for each of your endpoints.
Can you elaborate on the specific problems that DI aims to solve in modern software development?
Our code has dependencies. Some examples: a data supplier, a user authorization validator, an error logger. When we "new" up these dependency objects inside a class, we are not only getting the functionality but also choosing how that functionality is implemented. This is referred to as tight coupling.
Let's take an example: we need logging throughout our application. Each class news up a ConsoleLogger object to write logs to the console. In this scenario, each class is not only getting functionality (logging), but also choosing how that logging is implemented (logging to the console). This creates a tight-coupling between our class and it's dependency on a particular logger. Now imagine that we need to change to a different logging implementation: we would need to change all of the classes that use a logger.
With DI, instead of newing up a logger in the class, we specify that we need logging functionality (such as asking for an ILogger implementation with a constructor parameter). A fully functional logger is then injected into the class -- often by a DI container. Now our class only cares about the functionality (logging) and does not care about the specific implementation. If we need to change to a different type of logging, we only need to update things in one place (our DI container). We do not need to touch our existing classes at all. This is referred to as loose coupling; and it offers a number of advantages.
How does DI facilitate the creation of loosely coupled applications, and why is this important?
Loosely coupled applications let us take a more modular approach to our code. This lets us create functionality and change things quickly. With loosely coupled pieces, we can snap in a relevant piece of functionality (such as a sales tax calculator based on a specific location). We can swap out one piece of functionality for another (such as changing from a local file-based data store to a cloud-based distributed one). We can replace a piece of functionality with a fake or mock for unit testing. We can also un-snap pieces, add functionality in-between (called "interception"), and snap things back together again with minimal (or no) changes to our existing objects. I often use this last scenario to add data caching or retry functionality.
Also, with modularity in mind, our loosely coupled pieces isolate functionality. We have certain pieces for business logic, certain pieces for logging, certain pieces for data access, and certain pieces that handle user interaction. When something goes wrong, it's easier to find the problem due to this isolation -- the functionality is in a specific part of the code. (And good unit tests also help us quickly pinpoint where things go wrong.)
What are one or two common pitfalls developers encounter when implementing Dependency Injection for the first time, and how can they be avoided?
One common pitfall is not really "getting" DI. If we need to change or add to an application that already has DI, we copy and paste some code, make a few adjustments, and then cross our fingers and hope that it works. This session is all about making sure that we understand those core concepts. Then we can use DI intentionally and understand the changes that we make.
Another common issue is over injection -- getting too excited about DI and injecting as much as we can in our applications. The result is complexity without benefit, and overly complex applications are no fun to support. One way to fix this is to be aware of what types of dependencies we need to inject. Start by focusing on the things that are likely to change, on places where we may need to add functionality, and on classes or systems we may want to fake for testing purposes. I generally advise newcomers to inject dependencies only when they have a good reason for it. As experience grows, you will get better at determining which items are good candidates for DI.
Could you discuss the differences and use cases for constructor injection versus property injection?
One of the great things about Dependency Injection is that there is more than one way to do it. A few primary patterns are constructor injection, property injection, and method injection.
Constructor injection forces us to provide a dependency. With constructor injection the dependency is injected as a constructor parameter. When someone creates the object, they must also supply the dependency as an argument. I usually default to constructor injection because it makes the dependency obvious (it's right there in the constructor parameters), and the dependency can be made available to the entire class. For example, I may need an object that supplies data. This dependency is not optional, and I want someone to specifically supply that object to the class. Constructor injection is a good pattern here.
Property injection is good for optional dependencies. With property injection, the dependency is injected as a property on the class. Commonly the property will have a default value (which may have no functionality). When someone creates the object, they do not need to supply the dependency. If they want to override the default, they can assign a value to the property; otherwise, the default will be used. This is great if the dependency is truly optional. As an example, logging may be an optional dependency. My class can have a default logger property that does nothing. But if someone needs logging, they can override the property with a logger of their choosing (such as logging to the console or logging to a database).
One downside to property injection is that the dependency is a bit hidden. We may not know that the property exists or that we can override it. This is why I generally choose constructor injection unless something is truly optional.
The session mentions using DI without a container. Could you describe a practical example of this and explain the benefits?
DI containers are awesome. They handle a lot of work for us, but they also hide what they do. When someone is new to DI, there may be confusion between DI (meaning the concepts and patterns of DI) and the implementation (the details of the DI container). By using the DI patterns without a container, we take a more hands-on approach to see how DI works and why we get the benefits that we do. We also see that we may not need a DI container for straight-forward scenarios with small numbers of objects. Once things get a bit more complex, it's great to have a DI container handle most of the work for us. And if we have a solid foundation in DI concepts, then we can be more confident that we are using a DI container effectively.
How does a DI container "add some magic" to the process, and what are the implications for code reduction?
When we use a DI container, our code is more declarative. For example, we can configure the container with a mapping between an interface (such as ILogger) and the actual type we want to use (such as a ConsoleLogger). When we ask the container for an object that needs a logger, the container handles the details of creating things and makes sure that our object gets the right logger. This is all code that we do not have to write.
A DI container handles many more details for us as well. It figures out how to create objects for us, including automatically injecting any dependencies that are needed for that creation. In addition, the DI container deals with the lifetime of the objects -- whether to keep an object around to re-use it later or to create a new instance each time we need it. As developers, we configure the lifetime based on factors such as how much memory is used or how frequently a particular object is needed. But we can leave all of the details on exactly how that happens up to the DI container.
For those new to DI, what resources or practices do you recommend to deepen their understanding and skill set?
I learn well with books, so I tend to recommend "Dependency Injection: Principles, Patterns, and Practices" by Steven van Deusen and Mark Seemann. This is a bit of an older book (from 2019), but one of the great things about patterns and concepts is that they don't change. So even if we are using different DI containers today than we were 5 years ago, we are still using the same concepts to understand them.
I also have several articles that dive deeper into topics such as different ways to implement Property Injection, using the Decorator pattern to add logging, caching, and re-try functionality, and how to use DI to help test "DateTime.Now." Links to these articles can be found here.
Looking beyond the basics, what advanced DI techniques or patterns should developers aim to learn?
There are quite a few topics to explore in Dependency Injection. Here are a few I recommend when you're ready to learn more:
- Lifetime Management: Common lifetimes are Singleton, Scoped, and Transient. This determines whether an object is created new each time or whether it is re-used (and the scope of where it is re-used). Which you choose depends on the needs of your application.
- Stable vs. Volatile Dependencies: Which dependencies are likely to change? Which dependencies do we have control over? These are questions that help us determine whether a dependency is stable or volatile -- and in turn, whether a dependency is a good candidate for Dependency Injection.
- Auxiliary Patterns: The Decorator Pattern, Proxy Pattern, and Null Object Pattern are not directly related to Dependency Injection, but they can be very useful. For example, in the session, we use the Decorator Pattern to add caching functionality in the demo. We can use these auxiliary patterns to make our DI more effective.
- Using Factory Methods with DI Containers: DI containers are really good at using constructors to create objects. But sometimes we need to use a factory method instead. Fortunately for us, DI containers have a way to specify a factory method to use for an object. Be sure to check on how to do this for your preferred container.
Note: Those wishing to attend the conference can save hundreds of dollars by registering early, according to the event's pricing page. "Register for VSLive! at Microsoft HQ by the Early Bird deadline of June 7 to save up to $400 and secure your seat for intensive developer training at Microsoft HQ in Redmond!" said the organizer of the developer conference.
Posted by David Ramel on 05/21/20240 comments

Back in January, I predicted this would be the year of AI. In February I gave you an introduction to GitHub Copilot. Now, with the general availability release of GitHub Copilot in the CLI, you can have all the power of AI and GitHub Copilot while never having to leave the safety of your command line.
AI integration in development tools has transformed the landscape of coding and software design. AI can analyze vast amounts of code to provide context-relevant suggestions, anticipate errors and offer solutions, effectively acting as a pair programmer with access to the world's programming knowledge. This leads to faster debugging, more efficient code writing and, ultimately, higher-quality software projects.
For many developers, the command line is a control center. It offers speed, precision and a streamlined interface that GUIs often can't match. By integrating AI tools directly into the command line, developers can maintain their workflow's rhythm without switching contexts, which is crucial for maintaining focus and productivity.
GitHub Copilot in the CLI
GitHub Copilot, available as an extension in multiple IDEs, now extends its capabilities to the command line interface. GitHub Copilot in the CLI provides a chat-like interface in your terminal that allows you to ask questions about the command line. You can ask GitHub Copilot to provide either command line suggestions or to explain given commands.
For example, you can use Copilot to help you craft the right command for a given task, which could be a shell command, git command or even how to use the GitHub CLI itself. You can also give Copilot a command you don't understand, and it will explain it to you using natural language. To really understand what is going on, let's see this in action.
Using GitHub Copilot in the CLI
To get started using GitHub Copilot in the CLI, you first need to install the GitHub CLI. The GitHub CLI is an open source tool for using GitHub from your computer's command line. Using it, you can do most things you can do in the GitHub GUI without leaving your command prompt. And one of those things is to use GitHub Copilot.
Next, we need to install the GitHub Copilot in the CLI extension into the GitHub CLI. This is done by running the GitHub CLI extension install command:
gh extension install github/gh-copilot
Note: You will need a GitHub Copilot Individual, Business or Enterprise license to use GitHub Copilot in the CLI.
After installing the extension, and running "gh auth" to login, you are ready to start using Copilot in the CLI.
Explain a Command
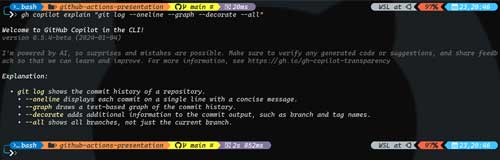
You can ask Copilot in the CLI to explain a shell, git or GitHub CLI command using the "explain" command. For example, the following git command is used by many developers to view their git history:
git log --oneline --graph --decorate --all
You can run:
gh copilot explain "git log --oneline --graph --decorate –all"
and it will explain what the command is doing, as shown in Figure 1.
 [Click on image for larger view.]
Figure 1. Copilot in the CLI explaining the git log command.
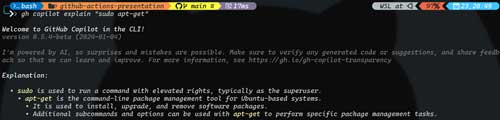
Here is another example of Copilot explaining what the "sudo apt-get" command does.
 [Click on image for larger view.]
Figure 2. Explaining the sudo apt-get command.
Copilot in the CLI explains commands in plain language, making it easy for you to understand what the command is doing. You don't have to worry about going through documentation because Copilot's explanation includes information about command input and output and can even provide practical examples for you to use.
Suggest a Command
You can ask Copilot in the CLI to suggest a shell, git or GitHub CLI command using the "suggest" command. For example, let's say you want to find all the JavaScript files that are older than 10 minutes, excluding the node_modules folder. You could probably search Stack Overflow and maybe find an answer that gets you part of the way there. Or, you could use Copilot, and run the following command:
gh copilot suggest -t shell "find all javascript files older than 10 minutes, excluding the node_modules folder"
Figure 3 shows the results of running this command. As you can see, after you ask Copilot for help, you then have the option of continuing to revise the answer, copying it to the clipboard to use it, or even having it explained to you.
 [Click on image for larger view.]
Figure 3. Asking for help on how to find JavaScript files older than 10 minutes.
Conclusion
Integrating AI tools like GitHub Copilot in the CLI into the command line not only streamlines the development process but also significantly boosts productivity and code quality. By leveraging these tools, developers can enjoy a seamless, intuitive AI-enhanced coding experience that aligns with the dynamic demands of modern software development.
As the field of AI continues to evolve, we can anticipate even more sophisticated tools that further integrate AI into the developer's toolkit, making the command line an even more powerful ally in the quest for efficient and innovative software development.
Posted by Mickey Gousset on 04/25/20240 comments

It only takes 20 minutes to upgrade your Git game in Visual Studio 2022, and Jessie Houghton, Visual Studio Program Manager at Microsoft, will show you how at the August 5-9 Visual Studio Live! developer conference being held at Microsoft headquarters in Redmond, Wash.
In their "Fast Focus" session, you'll learn how to leverage the newest Git features to your daily advantage (think AI assistance) and gain confidence in navigating common pitfalls, all with Git and GitHub.
Specifically, attendees are promised to learn how to:
- Leverage the newest Git tooling and GitHub updates
- Level up your Git usage to superpower you or your team's productivity
- Navigate common Git pitfalls
We caught up with Houghton to learn more about their session in a short Q&A.
VisualStudioLive! What inspired you to present a session on this topic?
Houghton: As the product manager for the Visual Studio Git tooling team, I spend my time talking to customers and creating new features to help solve their issues with version control. Presenting on these new features help more people learn about them and benefit from what's built into their favorite IDE!
 "Lots of people are comfortable with the very basics of Git, but the Visual Studio Git tooling UI can empower you to master powerful, advanced topics that are difficult to learn from the CLI alone."
Jessie Houghton, VS Program Manager, Microsoft
Lots of people are comfortable with the very basics of Git, but the Visual Studio Git tooling UI can empower you to master powerful, advanced topics that are difficult to learn from the CLI alone.
Can you describe just one recent Git tooling feature introduced in Visual Studio 2022 and its significance for developers?
A favorite of mine is the multi-branch graph. Using Visual Studio to visualize your feature branch in relation to the main development branch gives you confidence when rebasing or merging changes. It demystifies the underlying concepts that govern how Git works, and it unlocks easier cherry-picking and comparing across branches. Learn more from the feature release blog, Multi-Branch Graph Available for General Audiences.
How does the integration of AI assistance with Git tooling enhance productivity and version control management in Visual Studio 2022?
One of the primary benefits of version control is access to the entire history of the project. Good documentation in commit messages and pull request descriptions empower teams to move faster and create better products. For example, when looking to diagnose a bug or implement a similar feature to an existing one, a descriptive commit message can make it super obvious which parts of the code are important to dig into and what important decisions went into an implementation. On the other hand poor quality messages require you to spend more time trying to figure out manually why the code works a certain way. The major problem we stumble into is that writing good documentation is tedious! AI is a great fit to solve this problem! By generating the first draft of your commit message or pull request description, AI empowers you to spend less time writing documentation and more time writing code, while reaping all of the benefits of history listed above. Also, even if you come across a poor description in the history, AI can explain those commits as well, helping you parse through large commits with ease.
What are one or two common Git pitfalls that developers face, and how does this session aim to address them?
Demonstrating the new AI features will help address the common pitfall of dealing with poor quality Git history, as was mentioned above. Another nightmare for developers is recovering from Git mistakes. We all make them, but fixing them in the command line is a painful process of looking up commands we rarely use. I'll share some common mistakes and their corresponding easy recovery mechanisms that the Visual Studio Git tooling offers you.
With the continuous updates to GitHub and Git tooling, how should developers stay informed and proficient in these changes?
Check out my posts on Visual Studio DevBlogs and all of the other great Visual Studio updates hosted there, as well.
In terms of collaboration and project management, how do the new features in Git and GitHub improve the workflow for teams?
One example was detailed above. For most teams, version control is a requirement, so learning how to maximize the efficiency of your interactions with Git allows you to focus more on your code. For example, using features like referencing GitHub issues in your commits helps your teammates stay updated on your work and can update the backlog automatically.
For someone looking to "level up" their Git usage, what foundational practices would you recommend mastering first?
We've got an entire learning library on YouTube with Beginner, Intermediate, and Advanced content to help you at any level of Git usage, Git Tooling in Visual Studio - YouTube. The beginner series will get you started with the most important basics and major work flow.
How do the enhancements in Visual Studio 2022's Git tooling reflect the evolving needs of modern software development?
Version control is an integral tool for the modern software developer. There are no more excuses for code to not be managed, backed up, and hosted in the cloud on GitHub. Coupled with the exciting demands of an AI transformed world, developers need their IDEs to keep up with the demand to provide solid version control integration and AI driven innovation.
What advice do you have for developers who are looking to seamlessly integrate these new Git features into their existing projects?
If you haven't checked out the Git tooling in Visual Studio in a while, take a second look. We've made tons of improvements and added additional features that may make you second guess using the command line. If you're not using Git already, click the "Add to Source Control" button in the status bar in Visual Studio to get started.
Note: Those wishing to attend the conference can save hundreds of dollars by registering early, according to the event's pricing page. "Register for VSLive! at Microsoft HQ by the Early Bird deadline of June 7 to save up to $400 and secure your seat for intensive developer training at Microsoft HQ in Redmond!" said the organizer of the developer conference.
Posted by David Ramel on 04/18/20240 comments

As software projects get more complex, managing dependencies becomes an increasingly critical task for developers. Dependencies, the external packages or libraries that your project relies on, can significantly impact your application's security, maintainability and compatibility. This is particularly true in the .NET ecosystem, where projects often rely on a vast array of NuGet packages.
In this article, we'll explore effective strategies for managing these dependencies, with a focus on identifying and mitigating vulnerabilities, leveraging tools such as GitHub Dependabot, and discussing other open source alternatives that can bolster your security posture.
Understanding Dependency Management
Before diving into the tools and practices, it's essential to grasp what dependency management entails. Dependency management involves:
- Identifying dependencies: Knowing what libraries or frameworks your project relies on.
- Vulnerability tracking: Monitoring dependencies for any security vulnerabilities and addressing them promptly.
The Importance of Keeping Dependencies Updated
Regularly updating dependencies is crucial for several reasons. Primarily, it ensures your application is secure from known vulnerabilities often patched in later versions of the dependencies. Moreover, updates can bring performance improvements, new features and compatibility with newer technologies, enhancing your project's overall quality and lifespan.
One of the biggest areas where I see developers mess up is not checking to see if the dependencies in their code have security vulnerabilities open against them. This is especially true with code that hasn't been updated in several years, but is still being used in production. Security vulnerabilities in code like this could lead to intellectual property losses, data breaches and worse.
Tools for Managing Dependencies
If you use GitHub, then GitHub Dependabot is an invaluable tool that automates the monitoring and updating of dependencies -- and it's free.
Integrated directly into GitHub, Dependabot scans your project's dependency files (such as `.csproj` or `packages.config` for .NET projects) and compares the package versions you are using against the GitHub Advisory Database. If it finds you are using a vulnerable package, it will open an alert in the repository, as shown in Figure 1. This alert gives you details of the vulnerability, as well as information on what version of the package to upgrade to in order to resolve the vulnerability.
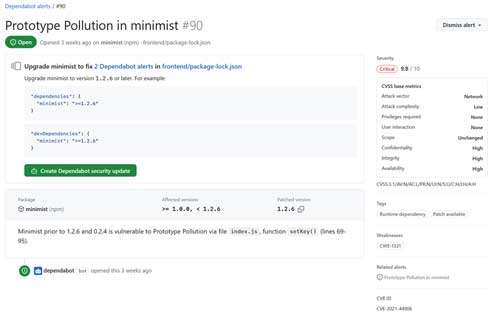 [Click on image for larger view.] Figure 1. Dependabot Alert
Dependabot can also automatically generate pull requests to update the code to the non-vulnerable new version, and can even let you know when new versions of the package become available.
As mentioned, Dependabot is free for GitHub users. There is also a paid version available for Azure DevOps users as part of GitHub Advanced Security for Azure DevOps.
Other Open Source Tools
While Dependabot is a powerful tool for managing dependencies, several other open source tools can complement its capabilities:
- NuGet Package Explorer: A Windows application that allows you to view the contents of NuGet packages, explore their dependencies and determine the package's compatibility with different versions of .NET. This tool is essential for manually reviewing dependencies before incorporating them into your project.
- OWASP Dependency-Check: An open source tool that identifies project dependencies and checks if there are any known, publicly disclosed vulnerabilities. Although it requires manual setup and integration into your build process, its comprehensive database of vulnerabilities makes it a valuable tool for .NET developers.
- Snyk: Though not entirely open source, Snyk offers a free tier and integrates well with .NET projects. It scans dependencies for vulnerabilities and provides detailed remediation guidance. Snyk can run within your CI/CD pipeline, ensuring vulnerabilities are caught early in the development cycle.
Best Practices for Dependency Management
To effectively manage your .NET project dependencies, consider the following best practices:
- Regularly Review and Update Dependencies: Leverage tools like Dependabot to automate this process, but also allocate time for manual review, especially for major version updates that might introduce breaking changes.
- Adopt a Security-First Mindset: Prioritize security updates and apply them as soon as possible. Use tools like OWASP Dependency-Check and Snyk to identify potential vulnerabilities and address them promptly.
- Understand Your Dependencies: Before adding a new dependency, evaluate its necessity, license compatibility and its own dependency tree. This can prevent introducing unnecessary risks into your project.
- Educate Your Team: Ensure that all team members understand the importance of dependency management and are familiar with the tools and practices you've adopted. This collective awareness can help maintain a secure and stable codebase.
Effective dependency management is a cornerstone of modern software development, particularly in complex ecosystems like .NET. By leveraging tools such as GitHub Dependabot and incorporating other open source solutions into your workflow, you can significantly enhance the security and maintainability of your projects.
Remember, the goal is not just to react to vulnerabilities but to proactively manage your dependencies to prevent issues from arising. With the right tools and practices, you can.
Posted by Mickey Gousset on 03/26/20240 comments